Developer-Friendly Axure RP Prototyping Production and Management Workflow
1. Axure RP Page (Canvas) Setup Strategy_Developer-Friendly Layout
Before creating a popup, I design the Axure RP page structure differently from the start.
Step 1: Set Page Dimensions to Auto
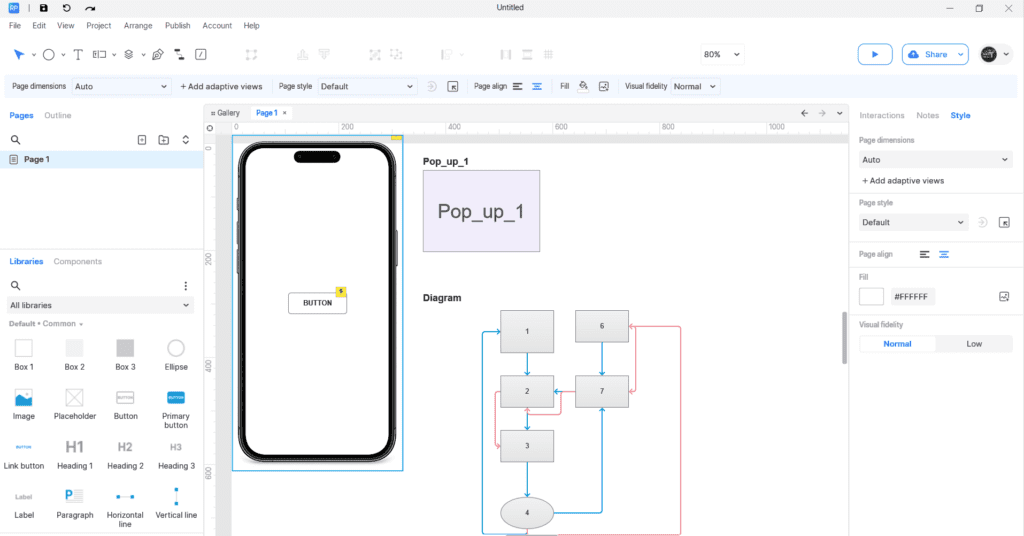
Instead of fixing the canvas to a mobile size, set Page Dimensions to Auto and use a wider canvas.
Step 2: Place the Mobile Mockup at (0,0)
Place the mobile mockup image at coordinate 0,0.
Step 3: Design UI Inside the Mockup
All actual UI elements are designed inside the mobile frame.
Step 4: Design Popups and Logic Diagrams Outside the Mockup
☞ Why Work This Way?
There are times when developers request the following:
- They want to see the base screen and popup at the same time.
- They want to inspect only the popup layout in detail.
- They want to immediately review backend logic and feature explanations.
- They missed a feature because annotation numbers overlapped and were not visible.
So I use a wider canvas and utilize the empty space outside the mockup to:
- Draw the popup window
- Create logic diagrams
- Explain backend flow
- Add references for hidden annotation numbers
- Organize edge cases
After organizing the Axure file this way and sharing the link with developers, they can view it in preview mode.
- UI design and popup design
- Backend logic for the feature
- More detailed functional explanations
- Explanations for hidden annotation numbers
- Edge cases
All of this can be viewed simultaneously on one screen, which also helps prevent missing items.
2. Creating a Basic Popup in Axure RP Prototyping Using Dynamic Panels
The common way to create a popup in an Axure RP prototype is as follows.
- Design the popup layout
- Select all elements of the designed popup → Right-click → Create Dynamic Panel
- Name the Dynamic Panel (It is important to name it in advance because it becomes confusing later when there are many elements.)
3. Opening a Popup in an Axure RP Prototyping
There are generally two ways to open a popup:
- When opening a popup by pressing a button:
- Create the button that will open the popup
- Add interaction to the button → Click or tap → Show/Hide → Select the Dynamic Panel created earlier as the Target → Choose Show → (If you want an effect, you can also add) Setting animate(ex. fade/swing/1000~1500)
- When the popup automatically opens when the page loads:
- Click on an empty area of the page
- Add interaction → Page Loaded → Show/Hide → Select the Dynamic Panel created earlier as the Target → Choose Show → (If you want an effect) Setting animate
After completing this, you must add the following process to ensure the popup opens at the center of the UI page. However, from this point, the method differs depending on how you use the canvas.
Method 1: When Using a Fixed Mobile-Sized Canvas
- With the popup Dynamic Panel placed outside the canvas (outside the mockup design), right-click the popup Dynamic Panel
- Pin to Browser → Pin to browser window → Horizontal pin: Center → Vertical pin: Middle → Check Keep in front
- Click the popup Dynamic Panel → Click the eye icon in the upper right corner so it turns yellow (If you do not do this, the popup will appear continuously in the center of the page.)
In this case, in preview mode, the popup will not be visible until the popup-opening logic is triggered.
Method 2: When Using a Wide Canvas
Assuming the mobile mockup is fixed, complex functions are not necessary.
- Temporarily move the popup to the actual position where it should appear (center of the mockup)
- Check the X and Y coordinates in the upper-right panel and record them somewhere
- Move the popup back outside the mockup
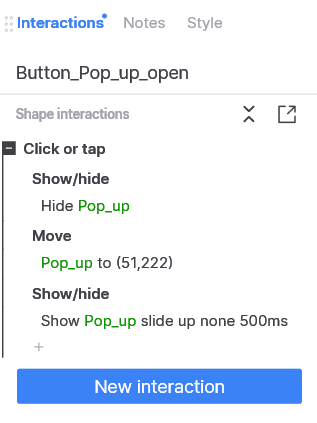
- In the popup open button or page interaction, add an interaction above the Show interaction created earlier → Show/Hide → Select the popup Dynamic Panel as the Target → Choose Hide
- Directly below the interaction just created, add another interaction → Move → Select the popup Dynamic Panel as the Target → Choose ‘To’ → Enter the recorded (X, Y) coordinates
When created this way, the interaction structure of the popup open button will look like the following image:
The advantages of this method are as follows.
⦁ Developers can check the base screen and popup UI simultaneously
⦁ The popup design can be reviewed without running Preview
⦁ Since there is no hidden panel (yellow area), there is no risk of missing elements during re-editing
4. Closing a Popup in an Axure RP Prototyping
This method also has two approaches. But you can choose both!
- When there is a close button inside the popup
- Add a close button inside the popup → Add interaction to the close button Click or tap → Show/Hide → Select the popup Dynamic Panel created earlier as the Target → Choose Hide
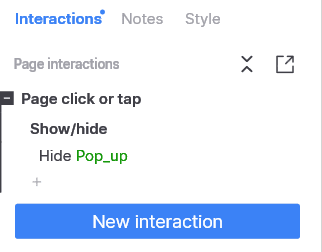
- When you want the popup to close by clicking outside the popup without a close button:
- Add interaction to the background Click or tap → Show/Hide → Select the popup Dynamic Panel created earlier as the Target → Choose Hide
5. Is This the Only Correct Way?
Of course not.
There may be more advanced or automated approaches. However, I wanted to share that this is one practical method.
This method is:
- Practical in real projects
- Friendly for developer collaboration
- Reduces editing stress
- Works reliably in projects
If there is a better method, feel free to share it in the comments.
6. Conclusion
Axure RP is an excellent tool for creating early-stage prototypes when used properly.
I would recommend that planners try using it at least once. It allows you to turn the abstract ideas in your head about a service into a tangible prototype and communicate those ideas visually with others.
Even if you are not a planner, anyone who wants to build a service needs a screen plan, just as a building requires a blueprint before construction begins.
In that sense, Axure RP is one of the most useful tools for structuring and visualizing service screens effectively.
And organizing structure is more important than complex interactions.
A well-organized structure improves:
- Developer communication
- Handoff clarity
- Editing efficiency
- Prototype stability
As the saying goes, if the body works harder at the beginning, the hands become more comfortable later.
When the canvas is organized from the start, later revisions and collaboration become much smoother.
Ultimately, a good Axure RP prototyping starts not with flashy interactions, but with a clear structure.
* Axure RP Download : Axure RP Homepage
📚 Axure RP Prototype Series
This article is Part 1 of the series.
- Part 1: Popup Window & Basic Setup Strategy (Current Article)
- Part 2: Axure Star Rating Interaction: Toggle-Based 5 to 1 Rating Logic (No 0 Score) (Axure Star Rating Interaction: Toggle-Based 5 to 1 Rating Logic (No 0 Score) – Lifetestlab)
- Part 3: 4 Axure Prototyping Tips: Toggle Switch, Automatic page transition, UI Flow & YouTube Embed (https://lifetestlab.kr/axure-prototyping-tips/)
👉 In the next article, I will cover how to implement a widely used Review Rating UI interaction using Dynamic Panels and conditional interactions.
* I am not affiliated with Axure or related to the company in any way. This article was written purely based on personal experimentation and trial-and-error experience.