1. Why I Designed This Axure Star Rating Interaction as a Toggle Instead of a Simple Click
In many real-world products, the rating scale is intentionally designed from 1 to 5 instead of including 0.
This is not because users never give 0 stars, but because limiting the minimum to 1 simplifies validation, data handling, and edge-case management in production systems.
So instead of building a traditional “empty to full” rating system, I built a toggle-based axure star rating interaction where:
- Default view shows 5 filled stars
- Clicking a star sets that rating
- Clicking the same star again reduces the rating by one
This creates a more natural adjustment behavior. Users change their mind. The UI should allow that without feeling rigid.
Because rating is emotional, but interaction must be logical.
2. Axure Star Rating Interaction Logic Overview
Default state: 5 stars filled
Minimum score: 1
Maximum score: 5
Example behavior:
- Initial: ★★★★★ (5)
- Click 2nd star → ★★☆☆☆ (2)
- Click 2nd star again → ★☆☆☆☆ (1)
- Click 4th star → ★★★★☆ (4)
- Click 4th star again → ★★★☆☆ (3)
This is not a simple “set value” system. It includes conditional toggle logic.
3. Step-by-Step Guide to Creating an Axure Star Rating Interaction
Step 1. Create One Dynamic Panel
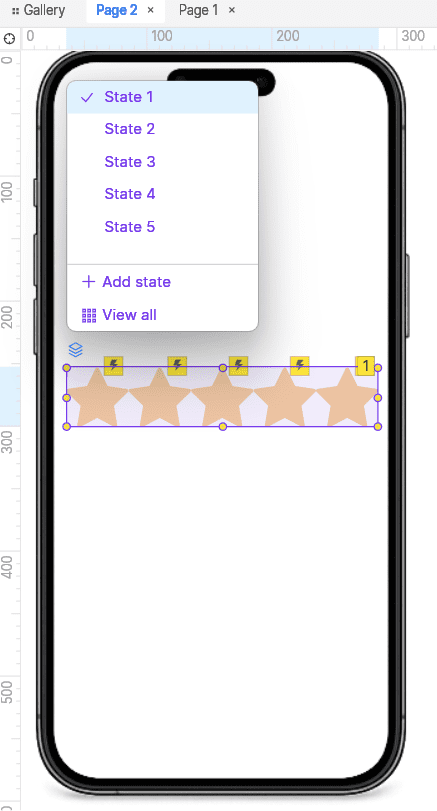
Create a single Dynamic Panel.
Panel name(exemple):
star_rating
Create 5 states.
State1: 5 stars filled
State2: 4 stars filled + 1 empty
State3: 3 stars filled + 2 empty
State4: 2 stars filled + 3 empty
State5: 1 star filled + 4 empty
State1 represents rating 5.
This mapping will be important later.
Step 2. Create 5 Transparent Click Areas

Create 5 transparent rectangles.
*Important rule:
They must be created OUTSIDE the dynamic panel while the panel is not selected.
Place each rectangle above each star position.
Each rectangle will receive interaction logic.
Step 3. Create Global Variable
Project → Global Variables → Add
Variable name(exemple):
gRating
Default value:
5
This ensures the UI initially displays 5 stars.
Step 4. First Star Interaction
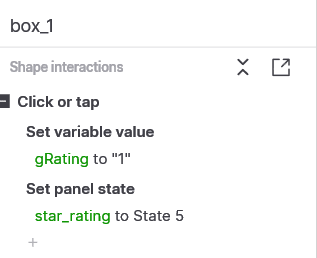
Select the rectangle above the first star.
Add interaction:
Click or Tap → Set Variable Value
Target: gRating
Set to: 1
Then add:
Set Panel State → star_rating → State5
This ensures clicking first star always sets rating to 1.
Step 5. Second Star Interaction (With Condition)

Select the rectangle above the second star.
Add interection:
Click or Tap → Add Case
Case 1
Condition:
If value of gRating equals 2
Actions:
Set Variable value : gRating = 1
Set Panel State : star_rating = State5
Case 2 (Else if true)
Set Variable value : gRating = 2
Set Panel State : star_rating = State4
Logic:
- If user already selected 2, clicking again reduces to 1
- Otherwise it becomes 2
Step 6. Third Star Interaction
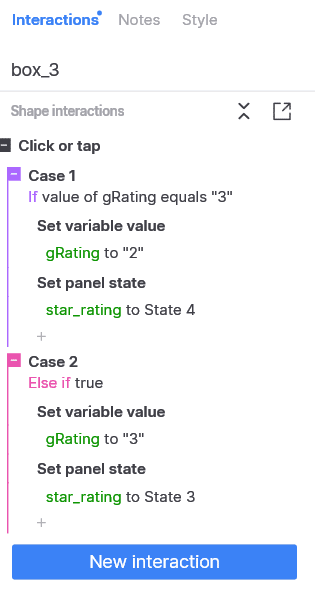
Copy the interaction from rectangle above the second star.
Select the rectangle above the third star.
Paste and Modify values.
Case 1 :
If gRating equals 3
Set Variable value – gRating = 2
Set Panel State = State4
Case 2(Else if true) :
Set Variable value – gRating = 3
Set Panel State = State3
Step 7. Fourth Star Interaction
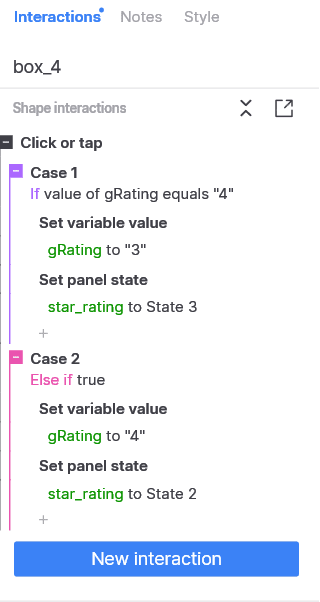
Copy previous interaction.
Select the rectangle above the forth star.
Paste and Modify values.
Case 1 :
If gRating equals 4
Set Variable value – gRating = 3
Set Panel State = State3
Case 2:
Set Variable value – gRating = 4
Set Panel State = State2
Step 8. Fifth Star Interaction

Copy previous interaction.
Select the rectangle above the fifth star.
Paste and Modify values.
Case 1 :
If gRating equals 5
Set Variable gRating = 4
Set Panel State = State2
Case 2 :
Set Variable gRating = 5
Set Panel State = State1
🎉 Done! Congratulations!
Complex as it may look at first glance, you can absolutely build axure star rating interaction if you follow the steps one by one.
If your stars are lighting up correctly right now, take a small victory lap!
Conclusion
This toggle-based axure star rating interaction balances realism and control.
Instead of blindly setting values, it adapts to repeated clicks and reflects natural user hesitation.
This approach is something I arrived at through trial and error while experimenting inside Axure.
If you know a more efficient or cleaner structure, feel free to share it.
Interaction design evolves through iteration, and there is always room to optimize.
Optimization is a bit like life — just when you think it’s stable, you notice one more thing to adjust.
* Axure RP Download : Axure RP Homepage
📚 Axure RP Prototype Series
This article is Part 2 of the series.
- Part 1: Popup Window & Basic Setup Strategy (Axure RP Prototyping Tutorial 1: Popup Window & Basic Setup – Lifetestlab)
- Part 2: Axure Star Rating Interection (Current Article)
- Part 3: 4 Axure Prototyping Tips: Toggle Switch, Automatic page transition, UI Flow & YouTube Embed (https://lifetestlab.kr/axure-prototyping-tips/)
👉 In the next article, I will walk through how to build a chatbot interaction prototype in Axure, including conversation flow logic and conditional responses.
* I am not affiliated with Axure or related to the company in any way. This article was written purely based on personal experimentation and trial-and-error experience.